Figyelem!
Szeretnék minden kedves képszerkesztőmet, akik elkészítik a képeimet megkérni arra, hogy küldjék el azokat nekem E-mailben.
Minden kép amit megküldtök nekem azzal megtiszteltek engem és a munkámat egyaránt. Az E-Mail címem a következő.
Ez nagyon kedves tőled, köszönöm!
Ha a Facebook-ot használod a képfeltöltésre kérlek jelöld be a nevem:
Igy nem kell keresgélnem ahhoz hogy megnézzem a képeket egyetlen csoportban sem.
All pictures what you sending me its honored me and my work. My E-Mail address is
lilyanacalifornia@gmail.com
This is very kind of you,thank you so much.
If you use the Facebook to upload this images, please checked my name:ErycaFenyvesineErina
So i don't need to looking to see them any other group site. Thank you for your cooperation!
lilyanacalifornia@gmail.com
This is very kind of you,thank you so much.
If you use the Facebook to upload this images, please checked my name:ErycaFenyvesineErina
So i don't need to looking to see them any other group site. Thank you for your cooperation!
Je demande à tous ma photo éditeur qui prépare la présentation en mon honneur en nous envoyant un e-mail n'a pas été exposée décorations dans le MON EMAIL!
Le Facebook vérifier si mon nom est dans les endroits où vous pouvez:
Donc,je ne dois pas chercher vos images finies des groupes merci!


I work with PSPX8,but you can follow this tutorial wit another version of PSP.
My own basis Tutorial!
Materials


Background#152e43
Foreground#656f84
Foreground#656f84
New File-transparent 900x500 Take the
fill in the blank foreoground color of your cards New Raster Layers-Layers
Take thefill in the blank Background color of your cards
fill in the blank foreoground color of your cards New Raster Layers-Layers
Take the
fill in the blank Background color of your cards
File<Open<Mask0_54646_8caee2ae_XL
Click your picture
Layers<New Mask Layer<From Image
 Layers<Merge<Merge Group
File<Open<CityImage<Edit<Copy
Image<Edit<Paste As New Layers<Align the left edge of the City in PNG Layers<Duplicate
Image<Mirror<Mirror Horizontal
Layers<Merge<Merge Down
Layers<New Raster Layer
Look at the color GRADIENTE
 Side toolbar Paint Brush-Click tuto noe57decor
Stamp the left parties have images you see as the pictures

Effects-3D Effects-DropShadow
 Effects<TextureEffect<Weave
 Tool> Brush Distort> With the following values
 And I was the Decor at the end of which there is no winding and mouse left button pressed until until Search similar curlicue
not like decor develop another part of
 Layers<Duplicates
Image<Mirror
Horizantal<Layers<Merge<Merge Down
Layers<Duplicates
Image<FlipVertical
Move tool grab the image
is commensurate with those be
Ad tehe Top adjuster
low it decorral<Layers<Merge<Merge Down
Raster1 stand on layer
Effects<TexturaEffects<Weave
GapColor #0d273c WeaveColor#111c28


 MarcsiVersions


 MarikaVersion
 KataVersion


File<Open<CityImage<Edit<Copy
Image<Edit<Paste As New Layers<Align the left edge of the City in PNG Layers<Duplicate
Image<Mirror<Mirror Horizontal
Layers<Merge<Merge Down
Layers<New Raster Layer
Look at the color GRADIENTE

Stamp the left parties have images you see as the pictures

Effects-3D Effects-DropShadow


not like decor develop another part of

Image<Mirror
Horizantal<Layers<Merge<Merge Down
Layers<Duplicates
Image<FlipVertical
Move tool grab the image
is commensurate with those be
Ad tehe Top adjuster
low it decorral<Layers<Merge<Merge Down
Raster1 stand on layer
Effects<TexturaEffects<Weave
GapColor #0d273c WeaveColor#111c28

City stand on layers
Effects TexturaEffects<Weave
GapColor 30d273c WeaveColor#35577b
Layers-Merge-Merge Visible
Image-Add Borders 60pixels Magic Wand Pen designate the frame
GRADIENTE spout
Effects<3D Effects<Outer Bevel

Effects<TextureEffect<Blinds

Selection Select None
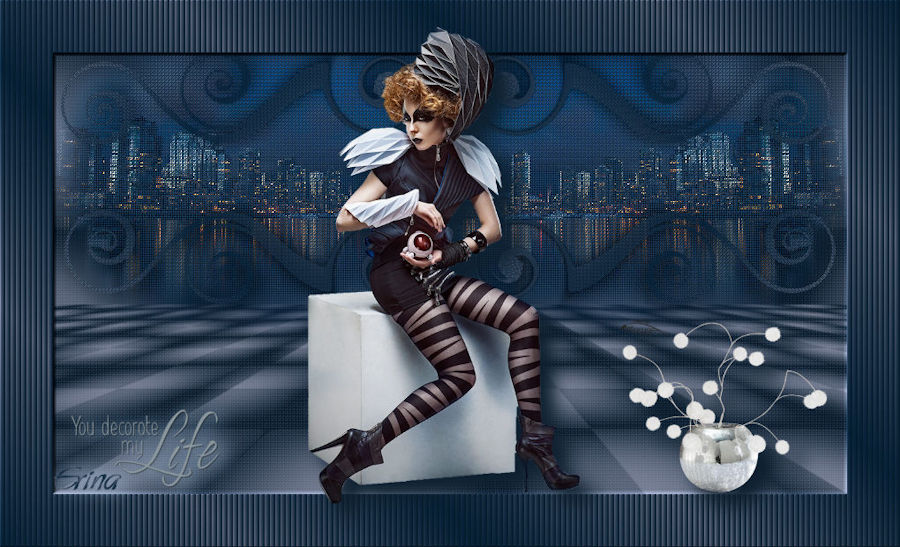
Fund-up shooting is now come to the Tube
New Raster Layer Layers
Add as File<Open<the women tubedat
Ana Ridzi
scales down and place it in the right place Give him a shadow of

New Raster Layer Layers
It also shielded to do Vases
New Raster Layer Layers
It also En inscription was put in the right place and shielded
Layers<Merge<MergeVisible
Signo sizing:900x500
Send me your picture facebook or
The images will be down the tutorial!
My Version


YouVersion
PinucciaVersion

Cila51 Version

SzelikeVersions


EvavVersion
